Pin It button on image hover

Friday, October 16, 2009

Double, double toil and trouble; Fire burn, and caldron bubble.


Happy October Everyone!!!

Fall is finally here in Los Angeles, and it is a balmy 85 degrees. Sometimes, when this time of year rolls around I wish I lived in a cooler climate. A lovely town where the leaves turn red and orange, jack-o-lanterns light up front porches and all the neighborhood kiddies are bundled up to play on the schoolyard. A quaint New England Town just like the one in the new ABC show Eastwick.

Well, for now I am happily staying here in LA. But, recently, I did get to visit the set of Eastwick and step in to my fantasy world for a day. I have done calligraphy for many Hollywood events, and luckily my work gets seen around town and my business gets many referrals. A few months ago the property master for Eastwick contacted me to do a whole lot of fun work for the show. Spell Books, invitations, old parchments, all sorts of decorative handwork!!!

Wanted to share a few pictures with y’all!!!!

Spell cover with drawing.

An invite from the Devil himself.

An inforative and decorative archival parchment.

A Magical Formula!


Hope you all check out the show!!!

Three very different women find themselves drawn together by a mysterious man who unleashes unique powers in each of them, and this small New England town will never be the same. The series is based on the popular movie "The Witches of Eastwick" and the novel of the same title by John Updike. "Eastwick" stars Rebecca Romijn, Lindsay Price, Jamie Ray Newman and Paul Gross. – ABC TV


Have a Happy Halloween!!!


Sunday, August 16, 2009

Queen Takes King

Living in Hollywood means sometimes being a part of amazing events!!
Recently, I was pleased to be a part of a signing for the launch of Gigi Grazer's new book Queen Takes King. I wanted to share a few pictures and tips with you guys from the big event.
The party took place at the Luau in Beverly Hills. The Luau is a newly reopened Hawaiian restaurant on Bedford drive. The decor is very neutral, as seen in the picture below. My job was to make the party a little more jazzy and link the decor to the theme of the book and the colors of the books cover.
It was easy to pick colors, I just had to match Gigi's cover. The tones of green and blue with touches of a blinged out silver made a real impact against the taupes, creams and whites of Luau.

To start with I chose a white tablecloth. White can be a base for any combination when setting a table, and most homes and restaurants have bone white plates and bowls that match a white cloth perfectly. I find it is easier to work with white than trying to match the various hues of cream cloths.
Next I made a simple, yet striking table runner. Runners do not have to be custom sewn, nor do you have to settle for a store bought one that doesn't match your decor. Instead, an easy affordable option is a paper runner.
First, I chose a thick green stock. I cut that down and ran it the length of the table. Don't worry about seams. Once the table is set they melt away.
Because, the cover of Gigi's book has an awesome glittery chess piece i decided to mimic that on the runner. I bought some glitter wrapping paper from Paper Source and cut it about 6 inches thinner than the green base layer. This way I had a nice border of the green surrounding the silver.

When setting a table I like to look for fun and individual touches that suit the mood of the party. I hand wrote all the menus and table cards. Again, I tied in green and blue and used a more casual and modern style of calligraphy.
Because this was a ladies event I played off the "queen" of the title and used tiaras as place card holders. You never have to settle for boring, and it is those special touches that make an event zing!!
Luau made a wonderful cocktail that tied in not only to the Hawaiian flare of the restaurant but the color scheme of the party as well. There are so many fun drinks out there these days!! Pink Cosmos, Orange Bloody Mary's, Tequila Sunrises always look great on a table. And my fave is always a yummy fresh green mojito. Don't think that decor has to be inedible. When planning a party the food and drink can and should be just as pleasing to the eye as to the tummy.
Each seat also had cards that could be used to start some pretty racy conversations. they made the event not only about the book but also about the theme of the book.

Lastly, I added purely decorative touches like the white chess pieces and simple crisp white flowers to the table to complete the look.
I think it made this table evoke the vibe of Gigi's book.
She did too.
This photo of her was featured in the September issue of Harper's Bazaar.
Look at my table. I am so proud!!!

Until next time; PARTY ON!!


Thursday, August 13, 2009

My creative space

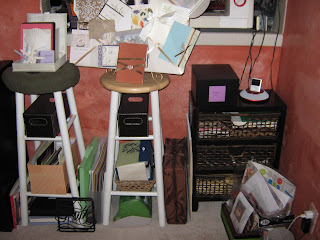
So, here's what I came up with from my inspirational friends and sites to fit my own creative needs and space.
I used a drawer and left it partially open for my big spools of ribbon. I got a ribbon container from the trusty Container Store, http://www.containerstore.com. They are a great source for your container needs. My jaw drops every time I go in there. And for those ribbon by the yard, I found these different size jars at IKEA, http://www.ikea.com to suit the various color palettes.


I then have flat files that I use for my 12 x 12's and flat sheets of paper (courtesy of my Paper Source manager , Jake Drake, allowing me to have something that was going to be thrown out.) He spared me from dumpster diving in Beverly Hills. Then I was able to convert 2 large bins of gift bags and tissue into one organized vertical gift bag holder that I also found at the Container Store.
The remaining containers were found at an office supply store where I keep creative odds and ends while labeling everything, of course.


My family comes down to visit and I put them to work. My dad was nice enough to provide me with some new lighting and a drafting table for my calligraphy. I explained my organizational dilemma. All of these things you see here, I had lined up against the wall on the floor. I desired something more professional looking rather than a make shift kinda studio. After being inspired by my friend, Michelle Foote, and her studio in Pasadena where Blue Note Press lives. http://www.bluenotepress.com . I adopted a bit of her idea and made it my own. I went to work my shift at Paper Source and I come home to voila! My mom was so kind, for she was magical. The piece of furniture is from IKEA and it comes in different colors to fit your own creative space. The bottom row I have each basket, which are from Target, on the bottom designated to a client & the materials being used for their project. The top row is designated for show, reviews and samples designed by 2 Hearts B 1.

This fun shabby chic piece is a lovely gift from my dear friend & colleague, Francesca Grossman from her studio of Creative Paperie.
http://www.linkedin.com/pub/francesca-grossman/4/844/7a8
I use it as a showcase to show off favors & place card samples.


My genius idea that I wanted to disclose here was how I turned my bar stools into shelving units. These bar stools were from my old apartment, when I had a bar. Now, I have no need for them, but I didn't exactly want to discard them either. So, I used the top as a table for displaying invites. Then I found containers at Target that I can put in the different slots to fit more creative odds and ends for making cards and prototypes. In the corner, I found a discounted piece of basket drawer fixture that worked perfectly with my new set up that I picked up again at Target. So, see I found everything I needed with a few resources, inspiration and a little creativity. I know that you too can be creative. No matter how big or small. You can make your space, a place to call your very own!

Friday, July 3, 2009

"A room of one's own and a mind without end"

I got the idea for this post when I went to Atlanta to visit my girlfriend France, of bananafish studios. She recently relocated from Los Angeles and has put a whole lot of time, energy and creativity in to creating her new home office/craft studio. I saw it and was inspired to make my own home office a bit better. Here is a little taste of her space. I think she has some very stylish, practical and inventive storage solutions.

For more pictures and details go to:

http://bananafishstudio.blogspot.com/2009/02/big-reveal.html

The title of this post comes from my favorite Virginia Woolf quote. I am trying to build a place to call my own, and I want it to fuel my mind without end. I know many of you must be doing the same. You are need a place to pay bills as well as place to drive your creativity. A spot to check your email and to help engage the thousands of ideas that you have.

Well, here I am to save the day!!

Ideas, ideas, ideas!!!!

A home office fulfills a number of roles: It's a place to coordinate schedules, a repository for all your receipts, but mostly a creative refuge. Despite its ability to satisfy countless needs, a workstation doesn't have to occupy a tremendous amount of space, much less an entire room. France is lucky to be in Georgia, where real estate is more reasonable. But for city gals and guys a small corner of a room is all you may have to create a home office.

When I set up my home office I am focusing on these 4 things. They are in no particular order;
storage, art, lighting, and the all important desktop.


Lighting is key for any space, and it is especially important in a home office. Some people love the hum of a florescent tube, while others need several small task lights scattered throughout their work space. I personally love natural light. I think that if you place your desk by a window with a view you really create a space that inspires you to work. If I did go with a lamp, it would be an old school swivel lamp. The one above is a very high end, a.k.a. maddeningly expensive lamp. Luckily, you can find lamps like this at more reasonable prices at ikea, west elm, or pottery barn. Below is the stuart pharmacy lamp from pottery barn. It's a much better fit with this little ladies budget.

When it comes to kitting out my desktop I will be shopping at three places. Target, Paper Source and See Jane Work. This is last months Desk Of The Month from seejanework.com.

Evey month they piece together a desk set so you don't have to. Some are whimsical and some are more practical. It is a great resource for those of you who may need guidance in what to buy for your desktop storage needs. Also, I am loving the new India inspired file folders and boxes from Paper Source.
If you are on a budget or want to get creative you don't need to buy boxes, bins, and other storage items. I'm sure you have everything you need laying around your house. In the picture below Martha Stewart uses glass jars to store spools of colored waxed-linen twine, a basic acrylic box to dispense seam binding, and small galvanized buckets to hold colored pencils. In my mini-craft closet I use old shoe boxes, mini-suitcases, and peanut cans to store my supplies. I also made a box out of my fave Japanese paper to store my crayons!!
And how about this great idea. All you need is twine, 2 thumb tacks, and some clothes pins. You can then hang art, business cards, inspiring quotes, or those pesky bills. So much more pleasing to my eye than a cork board.
Another storage item in a home office has to be a book shelf. For my husband I took 2 pieces of plywood, stained and lacquered them and the used black iron supports from my local hardware store to attach them to the wall.
For my office nook I want something a bit more peppy. This picture from Living Etc. is my inspiration.
I love how they have taken simply and inexpensive shelving and used hot orange paint on the inside to spice things up. 
 I think my plain jane Ikea bookshelf is about to get a makeover.

I am a very visual person. Clearly, what I do for a living is all about making things pretty, exciting and pleasing to the eye. So images always inspire me. Whether it be pictures of my baby brothers playing in the yard or amazing images of interiors or fashion, I try to surround myself with art that will inspire me. You can use frames, cork, tacks, or string to add some pizazz to your desk area. Utilize both the desktop and the surrounding walls.I love the idea of this old colorful map as art.
And this is just a snippet from my inspiration wall.
Well, I am off to go build my new space.
Just remember, if you create the right environment for your work the inspiration is bound to follow.

To get more ideas and to buy all you will need to organize your home, your office and your life, visit the following sites!!

marthastewart.com
liveingetc.com
http://bananafishstudio.blogspot.com
seejanework.com
paper-source.com

Saturday, June 13, 2009

Oh Yes, It's Ladies Night!!!!

Bachelorette Parties come in all shapes and sizes. From tame, small and refined to crazy, wild blow- outs. The one thing they all have in common is a group of girlfriends coming together to celebrate and love a future bride. This post will go into just a few of the ways you can host a bachelorette and also, how you can document it creatively.
We will start with more civilized ideas for the event at hand, and get more raucous as we go on.

First up would be a great idea for your friend the foodie or the wine lover.
A Wine Tasting.
This can be done on any scale. You can take a few friends to a local wine bar or restaurant. Or you could tour a local winery. And if you want to go whole hog, you could always hop on a flight to wine country and have a whole wonderful wine filled weekend.
Some sites to check out are http://www.novusvinum.com/winemap/main.html , which is a listing of local wine organizations by state, region, and country -- Hong Kong anyone??
Also, check out http://www.napavintners.com/ , i may be a biased Californian but nothing is better than Napa when it comes to wine, food and scenery.
Here are two common sense tip for any kind or size bachelorette party. A) Never let the bride pay or have any part in the organization - this is her time to be pampered and B)make sure all the ladies involved know how much they are going to be responsible for financially. Will you be the sole host in the financial department, or is everyone splitting it?? You don't want bitter bridesmaids, do you??

This is a scrapbook from a bachelorette wine tasting I hosted. All the ladies split the cost, and I was the compulsive planner/ den mother. In advance I booked the hotel, made spa appointments for all the ladies, had a wine tour set up for us and dinners at some very nice restaurants. Also, I booked a local driver, because you can never be to safe when copious amounts of wine are involved. Once the weekend started I had a welcome basket for all the girls in our suite. It is not only a sweet gesture, but also a necessity. You need fuel to party!!
Some things you may want to provide are water, power bars, fruit, champagne, sweet treats, chips, and aspirin.

Also included in the scrapbook was the calligraphy shown above. I had all the girls write notes to the blushing bride and then I calligraphied them and mounted them on separate pages. Each note can then face a page with a picture of the author and the bride. A special memory for special friends!!

An event that would be more close to home, or actually in your home is a sleepover. That is what I did for my bachelorette. I knew I didn't want to break the bank, and also wanted something low key ( no strippers here, please!!). So we went local.
The night started at one of my favorite old school celebrity dive, Chez Jay in Santa Monica. We ate drank, and we were very merry!! Then we headed over to the Fairmont hotel for our old school sleepover, only this time we had wine and beer!!
At the hotel my friends had disposable cameras, and enough make-up, nail polish and at home spa treats for the whole gang. It was just like seventh grade, only without the acne. We painted each others nails, had fun with face masks, and enjoyed the ocean sounds drifting up to our room. it was amazing. As the night ventured in to morning we ordered pizza, ate cake and watched some of my favorite movies; "Clue" and "Grease".
Then we all cuddled in to bed and slept for a few hours. I couldn't have had a better night or better friends.
When scrapbooking a casual event like this try to mix posed photos with candid ones. It tells a great story!!


Another fun idea is either a day at the beach or a beach weekend. So nice to get away from the hustle and the bustle of your day to day, especially when their is a future bride to pamper and spoil. Again, it is the kind of event that depending on time and budget can be small and casual
or an all out beach retreat.
If you decide to go local, and you are the host make sure to take into consideration which beach you will be heading to. Here in southern California many beaches charge for parking, and not all public beaches are equipped with bathrooms. Do your research, you don't want a relaxing day at the beach turning into a sweaty stressed out event.
Also, make sure you pack a bag of amenities for the whole group Sunscreen, water, food, drinks, magazines.
A great gift idea for the bride would be a beach bag full of some of her summer faves. Great books, a gift card to a surf shop, high end sunscreen or after sun lotions, hair treatments, and a
big yummy towel could all be things to give the lucky lady.
Also, try to find a beach with an eatery near by. After a long day in the sun nothing is better than some beach food and a cold beer.

When it comes to a bachelorette, you can stay close to home with a pool party, a luncheon, a swank catered dinner affair or venture out to hot spots like Miami(clubs), New York (always a winner with cosmos), or Vegas (The original adult playground).
But, no matter what you do though the most important thing is to think of the bride and what she would love!!

Friday, April 17, 2009

I say, "What about Breakfast At Tiffany's"

I can remember the first time I watched "Breakfast at Tiffany's".  I was a goofy new freshman in college, cozied up in my PJ's on my crummy dorm bed with 2 other girl's and I was transported.  Taken away from late teen acne, and college woes to a world that amazed me.  
Audrey, Parties, Baubles, Diamonds, That Hat, Those Glasses.... 
TIFFANY & CO!!!
Now that I am in the business of Parties, I can't begin to tell you how much that film inspires me.  Classic Elegance and Whimsy at the same time.  Simplicity with a touch of crazy mixed in for fun.  Those are descriptions of parties I like having for myself, and guides to the invites and events I design for other's.

Obviously, You start with the three basic colors; Tiffany Blue, White, and a hint of Black.  The whole event from start to finish can be covered with that palette, the invites, the decor, the favors.  Like I said simple and elegant!!

Today I am going to focus solely on the invites.  And I am gonna throw out more details than normal to show you how easy and fun this can be.  
You Can Do It!!!

This is a simple A7 sized (5x7) invite.  I started with a Tiffany Blue colored cardstock.  Paper Source has a very good match called Pool.  Then I formatted my text.  I used two fonts, one simple for all the pertinent details and another with more flourish to set the tone of the bridal shower.  
Next I took a still  from the film - thanks Google Images.  I made high quality prints on photo paper from my reliable desktop home printer, and affixed the photo using standard double stick tape. 
Then using a 3mm double faced satin ribbon I made a bow around the whole invite.  I will say that when making petite bows like this practice makes perfect.  Don't be discouraged if your first few aren't perfect.  Try practicing on a blank piece of stock.  Once you are happy with the bow and it is positioned on the invite you can use a tiny bit of double stick on the back to keep it in place, if it is snug then you won't even need the tape.  
The last touch is jewelry dahling!!  I used 4 tiny self adhesive pearls to dramatize the photo a bit.  Audrey needs her bling.


For this blog I have also made a separate sample to show how a simple invite can be altered and decked out to the nines. 

I Printed on Pool 8 1/2 x 11 cardstock.  I used the same fonts as before and I could fit 2 invites per sheet of paper.  For the outer layer of the invite I used a standard white 5x5 pre-folded cardstock.  I then cut my pool printed layer down to a 4x4 square and mounted it on the
 inside of the invite using double stick tape on all four corners.  Inside Complete!! 


For the exterior I started by using a table top cutter to take an inch off of the front right flap.  you can use an exacto as well.  I think the little glimpse of the colorful inside is enticing.  
Again, I ripped a photo from the internet.  This time I chose a color photo.  
On the previous invite I used pearls at an accent, on this one I mounted the photo on two layers of cardstock to give it a bit of a graphic pop.  Super simple to do folks, just measure your photo, then add 1/4 of an inch around it for the first layers measurement, and add 1/2 of an inch around it for the second layers measurements.  Then stack them all together using-- you guessed it double stick tape.
Next, make a bow around the whole invite, and remember to be patient.

And there you have a package just as delightful as that little blue box... 
well almost.
Cue Hollywood Music.....  THE END!!

A little inspiration.


For more Breakfast at Tiffany's inspiration go to http://www.imdb.com/title/tt0054698/

Tuesday, March 17, 2009

And Baby Makes Three


Sometimes helping a friend or a client out with her shower, be it wedding or baby, can be overwhelming.  Some "mom's to be"  have no idea what they want in a shower, and sometimes a bride can have way too many ideas.  But, thankfully, there are those friends and clients who have a good balance of specificity and ease.  Luckily, my friend Annie is the later. 
Annie is having a baby girl, but she isn't a pastels kinda gal.  Also, her nursery is a jungle animal theme, and she wanted the shower to reflect that.  She likes food, fun, and isn't too precious.  I thought to myself, this shower will be no sweat!!!

I started with a color palette of "jungle" colors for the invite.  Greens, blues, browns and oranges.


For the party I mixed it up a bit.  I went with Fuschia, Black and White.  Sorta like a hip lady zebra.

The linens, flowers, favors and paper goods all reflected those three core colors.  And because I didn't get too broad with my color palette all the items tied in together so nicely.


The two places where I added splashes of color were in the memory book, and desserts.  The desserts needed color because they all were based on jungle creatures -- Zebras, Monkeys, and Lions.  So, of course oranges, browns and greens got thrown in to the mix.


As for the memory book.  I used many colors here as well.  Mainly because this is a book that is going to be in the babies' nursery and I wanted the  colors to tie in nicely with all the many jungle themes that Annie has going on there.  This is a great idea for any kind of shower or party.  You have pre decorated cards and ask the guests to write words of advice, love, support, or congratulations.  You can then add these cards to any photo album you may create for the event.  It's a nice way to draw together photos, and words for the celebrant.


Also, I do have to give a shout out to co-hostesses.  Gemma Baker, Margee Magee, and Jennifer Smith all brought there creativity and love for Annie to bear on this shower and the result was an altogether amazing day!!!!!


Monday, February 23, 2009

Love Is In The Air

I know Valentine's Day has come and gone, but I want to reflect a little on love. It may sound cheesy, but I love, LOVE. Many people say, "Oh, Valentine's is a Hallmark Holiday", "It's too commercial", or even "I hate Valentine's Day". Well , to that I say pish-posh. How could celebrating love, whether it be romantic, platonic, or familial be, "commercial"? How can anyone hate LOVE???

If you can't buy your lady love a big rock for her ring finger, or your man a sports car a'la Mariah and Nick there are still thousands of inexpensive and heartfelt ways to show your love to mom, boyfriend, teacher, dog-sitter... I think you get the picture.

This year I went with cookies, candy, and home made cards for all my friends, family and clients. And for the hubs I had a quiet romantic picnic. Simple enough, huh?? I let what I love inspire me - and you can do the same. I find that red, white, pink and chocolate are a fun palette to create with. They are traditional with a modern little kick. Like neapolitan ice cream with a juicy cherry on top. As yummy for the eyes as it is for the belly.


Let it be known that Valentine's Day is not the only time of the year you can express your love, lost, or general infatuation. Here at 2 Hearts B1 I have no problem finding love year round.

Quick example. My husband Tim is a sports nut. If you say UCLA, or Lakers or Dodgers he is hooked. So, when he wants to have the boys over for a night of TV, beer and pizza I say, "have at it". But, I ensure you that they don't just sit around and watch the game. No, I don't think so, I put them to work. Lose the beer boys and grab the glue stick. As long as your mouth is wide open cheering for Kobe you might as well stick out that tongue and lick some stamps.

You may be saying to yourselves - how is this about love?? Well, I'll tell you. He gets to be with the friends he loves, watching a game he loves while helping the woman he loves, and I get to look at his smiling face and his handsome self sitting on my floor putting together invitations for a company that I have started with all my heart and know how much I am loved.

LOVE!!! Free, simple, everywhere - not commercial at all.

Related Posts Plugin for WordPress, Blogger...